The Yaesu FTM-500DR is their flagship product, it’s about $500, but it’s got so many small gripes it’s almost as if no one on their team has actually used a radio in a vehicle…
Powering It Off — Why do I need to hold the power button to shut it down? A single press or a double press should shut it off… instead they’ve decided the single press of the power button will lock it…
Locking Out a Memory Channel During Scanning — Each memory channel has a SCAN attribute of YES/NO… setting this takes about 10 steps… ten steps! So if you’re scanning around and hit on something you want to skip, you essentially can’t…
Memory Scanning, All or Nothing — There’s no apparent way to break up what memory channels you do scan — it’s all the channels or none.
SD Card is Half Baked — Using an SD Card to be able to program the radio seems like a great idea, but in practice both the RT Systems and Yaesu software don’t seem to work well with it… Neither of the software packages recognize that the Yaesu radio itself will save multiple copies of the data by incrementing a number on the file… so you have to go manually rename files… and while opening saved files in the software seems to work fine, the other direction hasn’t worked at all for me… it either fails or corrupts the radio and requires reprogramming by cable, this is true even if I format the card in the radio to have just a single saved version…
USB – Serial Cable — Why are still transferring data to these radios from a PC using serial? It takes ages to move data at 9600bps which seems unnecessary…
No Ignition Sense — I know this isn’t common on mobile radios, but I really don’t understand why not… the radio is connected to the battery, why not provide an input to let the radio be powered on/off along w/ the ignition w/o requiring relays and hard power cuts?
Audio Recording — I love the audio recording feature, but it’s recording in uncompressed audio with support for only a 32GB card… recording to a compressed format would let you store much more audio on the card
Audio Recording Part II — Quite a bit of the functions are persistent through power cycling, like memory scan, but unfortunately recording is not, so you need to start it each time (fortunately you can set one of the P-keys on the mic for that)
Maybe these are issues w/ all radios, maybe I’m not using it like most others would, but these are fairly annoying quirks. It’s only been a few weeks, so maybe it’ll grow on me…
I decided that I wanted to run an APRS iGate at my house because I found that low power transmissions in my neighborhood simply aren’t making it to the nearest Digipeater.
My current setup is a Mobilinkd 4 + iPhone SE 2020 + aprs.fi — but it’s not working very reliably — What I’m finding that is that every 2-3 days it stops beaconing and stops receiving packets… if I unlock the iPhone and fiddle it starts working, I’ll get a day or two, and then it will stop. My assumption is that iOS is simply not geared to run background applications like this and so it doesn’t work as a “set it and forget it” type of system.
That lead me to a purchase I made a long time ago… When I was first getting into APRS I bought a Coastal Chipworks TNC-Pi — it’s a TNC in the form of a Raspberry Pi “hat”, and I recall that it worked fairly well at the time using a Raspberry Pi 3B. I don’t fully recall what my goal at the time was, but it was using in a vehicle and ultimately when I found the Mobilinkd that worked out better. I parked the hardware, but pulled the Micro-SD.
Fast-forward a decade or so and I’ve decided to resurrect the TNC-Pi in the hopes that I can use it as an iGate and doing RF beaconing.
I’m grateful that despite having not sold this product for quite a while (I think over 5 years at this point?) the website linked above is still operational with instructions and files… but what I found was that time marched on in the world of Raspberry Pi development and left these little setup/helper apps behind.
If you try to run pitnc_getparams and see this message:
-bash: ./pitnc_getparams: cannot execute: required file not found
That means you’re likely running a 64-bit version of Raspbian / Raspberry Pi OS, but these applications are built for 32-bit.
You have two options:
Install a 32-bit version of Raspbian / Raspberry Pi OS
Install the required 32-bit libraries
If you decide to take the option 2 route — installing 32-bit libraries — these are the two fairly straight-forward commands I had to run to get going:
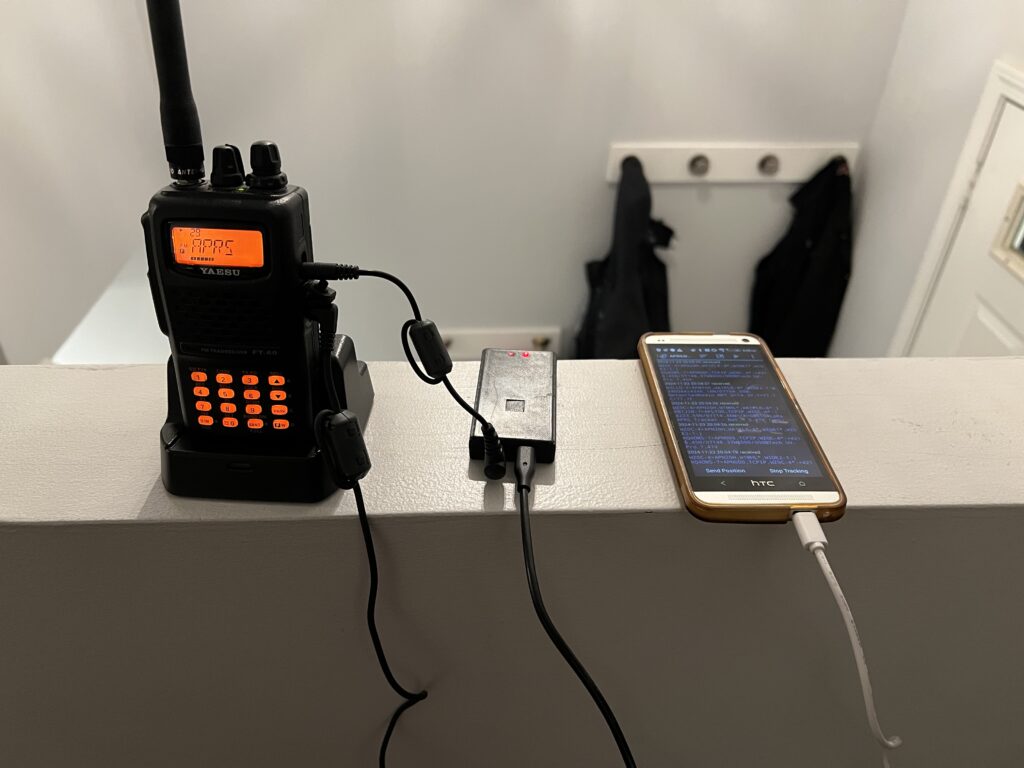
They don’t make em like they used to, but I’d have probably said that in 2013 when I bought that HTC One phone and the Yaesu radio… yet they’re both still kicking over 11 years later running APRSdroid. The TNC is a Mobilinkd TNC 2.1 bought in 2016.
I’m not much for talking on the radio, but I do love telemetry and packet radio.
I started writing this as notes on the network activity, but realized it sort of sounds like a review, so I wanted to make clear that I’m just a customer, I have no other relationship with this company, nor have I received anything from them for free. That said, I think that Litter Robot’s are the best automated litter handler on the market in the last 10 years, I bought my first one in 2009. They’re robust, easy to use, and work well.
Automated Pet Care Products (APCP) released an upgrade called ‘Connect’ for their latest Litter Robot model (the LRIII) which connects your litter box to the internet to let you monitor it in real-time, and receive pushed notifications of status changes or errors.
Why would you want this? Many reasons, but a few are–
Tracking litter box usage can give insights into your cat’s health–yes you can examine the ‘output’, but that doesn’t tell you if your cat is spending time in the box and not ‘producing’, but this app will
Reminds you when it’s full, or nearly full, which is especially useful if you keep it out of sight
Gives you peace of mind that the device is functioning correctly (in my experience, once the device is setup having it malfunction is extremely rare, basically non-existent, but now you can know for sure that it is or isn’t working and exactly how long it has been like that)
You enjoy keeping tabs on the mundane things in life, like watching your refrigerator temperatures or your cat’s bowel habits…
The upgrade to existing LRIII’s consists of:
New mainboard (physically looks the same, but probably has newer firmware and maybe a multi-colored power LED, it still uses a PICF18)
Communication board that attaches via a 4 conductor cable and has an ESP32 on it as well as a second PICF18
New control-face sticker (adds a WiFi logo and is black instead of blue)
A serial number sticker w/ QR code (the QR code is necessary to set up the app)
I’m wary of anything “IoT” being added to my network, you hear about too many devices become spies or part of a botnet. With an ESP32 and PIC’s I think the risk is low, I also think that APCP has a unique product with custom written firmware, but I was interested to see what data is being sent around.
To capture that data I used a Raspberry Pi 3 which I have setup as an access point on my network. Any device that uses its WiFi signal must route packets through the RPi3 which I can grab using a tool like tcpdump.
It looks like the LRIII Connect makes connections to an AWS instance every minute or so. The LRIII and AWS pass messages in the clear using UDP.
A typical set of messages looks like this:
04:51:29.171485 IP ESP_xxxxxx.cisco-sccp > ec2-54-83-xxx–xxx.compute-1.amazonaws.com.2001: UDP, length 74 E..f……P…*.6S…….Rv.>LR3,xxxxxxxxxxxxxx,H,AC,Rdy,W7,NL1,SM122:06:26,PL0,CS0113,110D,2F23538F
04:51:29.470242 IP ec2-54-83-xxx–xxx.compute-1.amazonaws.com.2001 > ESP_xxxxxx.cisco-sccp: UDP, length 20 E .0.{..-..96S….*………AOK,xxxxxxxxxxxxxx
Note, the italicized x’s were other decimal or hex values, but I removed them to attempt to anonymize myself for this public post. I’m sure that though APCP would have no issue identifying me if they wanted to though.
The first line above is a typical message from my LRIII to AWS, and the second is an “AOK” return from AWS.
There may be shorter versions of the LRIII message, but I haven’t seen them regularly enough to comment yet.
These are ‘heartbeat’ type messages that are sent very regularly, by doing this the LRIII effectively maintains a bidirectional communication link so that you can push commands to it via their app (like start a cycle, turn the night light on, etc) without any special network setup to allow incoming communication, because the LRIII is always reporting its status which gives the server a chance to issue it commands.
Breaking down the message from my LRIII to AWS it’s fairly clear what is being sent. I appreciate that APCP is sending their messages in the clear and that they are relatively easy to decipher:
LR3
Model
xxxxxxxxxxxxxx
ID of my LR3 (removed from this post, it has a 14 digit hex number)
H
???
AC
AC Power Present? I have a the backup battery, but disconnected it during upgrade to Connect and haven’t yet reconnected it
Rdy
Appears to be the status, I’ve seen Rdy,CST,CCP,CCC which I assume translatea roughtly to “Ready”, “Cat Sensor Timing” (waiting w/ Red Light), “Clean Cycle P” (Cycling), “Clean Cycle C” (Cycling Complete). This doesn’t appear to change when in sleep mode, so I don’t think it’s a straight translation of the LED pattern to a state.
W7
Wait Time? (To wait after cat exits the box defaults to 7 minutes)
NL1
Nightlight On/Off (mine is on, this goes to NL0 when I turn it off)
SM122:06:26
I think this has to do with Sleep Mode. It changed to SM100:00:00 at the time when I have sleep mode set, prior to that it was counting up to 24:00:00. So I assume this is a 24 hour counter.
PL0
Panel Lock On/Off
CS0113
Cat Sensor (weight) (This was 0x0110 when my cat was out, and 0x014F when in… dec “63” difference, so maybe it is 6.3lbs? I assume this is a post-calibration value and that calibration is done with the known weight of the empty machine to handle variation between load cells)
110D
Sequence number? Consecutively increases each time.
2F23538F
Hash? Other configuration bits? Seems to change each message
Anyway, that’s what I’ve seen so far. In ~12 hours of observation I haven’t seen any other noteworthy communication or anything that looks nefarious. The TLDR of this is that I won’t worry much about keeping it on my network–except for the fact that it’s yet another WPA2 client.
One thing I was happy about is that there is no local network communication. Some devices, like TP-Link plugs and Philips Hue, want to communicate between the mobile app and device on your local network. This makes using client isolation and guest networks problematic. The LRIII Connect doesn’t use this–both the LRIII and the mobile app appear to talk to remote servers as intermediaries for all communication.
I’ll try to take a look at the data passed by the mobile apps later, but I assume that will be encrypted because in my experience HTTPS is now required for API calls by Android and iOS.
The ultimate in function (mostly) over form.Humidity is rising…
It’s a mix of devices providing the data…
For the inside/outside/fridge temperatures and humidities I’m using 433MHz “Acurite” brand probes. They’re received using a Raspberry Pi with a USB SDR and RTL_433 package. I’m using a Python script to parse the JSON output from RTL_433 and then write that to a PHP script on my web server which stores the data in a MySQL database. The Acurite’s transmit every 16s, I only write data if the change is greater than 0.5 from the last value.
For the “Storage” info, it’s a 3G cellular connected Particle Electron with an AM2302 and a 4400mAh battery set in my tin-can storage unit where I store all my tools and stuff that doesn’t fit or belong in the apartment–This is a new storage unit, my old one was indoors and somewhat climate controlled. I’m a bit worried about how some of my stuff will do in this one which is a drive-up and seems to get very hot and very humid. The Electron will measure and transmit every hour, to preserve the battery it goes into deep sleep between readings.
For the “Soil” info, it’s a WiFi connected Particle Photon using an SH-10 stuffed into the spider plant’s pot and a YL-69 which measures resistance between two copper traces. I take readings every 10 minutes and transmit regardless of changes. This device is powered by an 18Ah 12V SLA battery so I do sleep the Photon between readings, but the SLA is kept float charged by mains.
Last year I bought a Particle Electron which is a little module that runs Arduino-like code, but has a cellular modem attached to it as well. I mated it to a temperature sensor and GPS, put it in a weather tight box and I keep it in the cargo area of my car connected to a switched 12V power point back there–it also has a lithium-ion battery which can keep it running (with judicious standby times) for a couple of weeks between running the car.
The sketch that I have running on it reports the position of my car every ~30s while the vehicle is running (12V is present) and every 1-5 hours when it’s not running (no 12V), there’s also other data reported like speed, course, temperature, cellular signal statistics, etc. The reporting is through a PHP script that writes it to a database.
This what you’d normally see, a traffic-overlay map with a Subaru icon representing the car’s location. The InfoWindow opens when the car hasn’t reported a position in more than 15 minutes, “Last Report” is the last report from the car and “Last Check” is the last time this browser pulled data from the server. Temp is the cargo area temperature in the car and battery percentage is for the lithium ion back up. The InfoWindow closes itself when the car is moving and the direction of the Subie icon matches the last reported course of the car:
I recently drove all over the place and I decided to see how the cellular signal was along the way so I put together a heatmap where the weights are based on the RSSI of the cellular signal. I was pretty impressed with how good the signal is, but also the fact that the service works in other countries (like Canada too).
I assume the roaming from USA to Canada was seamless, but I do have a watchdog that may have restarted the device when no cellular was detected for more than 10 minutes. That might explain the short blips around the border.
Cell Strength on my recent driving, red is stronger
I have a couple of fans around the apartment to keep us cool. Being the lazy type I found that using their manual switch is terrible; I really needed to be able to turn them on or off without getting out of bed or getting off the couch.
To add on/off control to them I decided to buy a couple of TP-Link WiFi-controlled plugs at Amazon. These aren’t bad, but the only way to control them is with an app that TP-Link produces–it’s cumbersome to pick up your phone, unlock, swipe to find the app, then touch the fan for the room you’re in, especially in the middle of the night.
What I needed was a really simple controller. Just a single button. If the fan is on, pushing the button turns it off. If the fan is off, pushing the button turns it on.
After some quick research it became clear that local network control of these WiFi plugs is really trivial–you make a TCP socket connection to their IP at port 9999 and then send a set of XOR’d JSON commands. If you poke around online you’ll find the details easily enough.
I have some Particle Photon’s (WiFi enabled Arduino’s), so I wrote up a quick sketch that works fairly well, but it ends up being a switch hung off of hook-up wire, a breadboard, and a 5V power supply–the control may be simple, but the rest is bulky and delicate. It’s also not cheap, the Photon’s alone are $20.
Then Amazon Prime Day happened and they put their Dash buttons up for 99¢ … that’s the perfect controller for this project! — It’s compact, easy to use (just one button), battery powered, and now it’s under $1 each.
Amazon only allowed buying of one of each brand, so I picked eight random products and ordered some Dash buttons. At under $1 each Amazon is certainly losing money sending me these, but I figured I spend so much there anyway they owe me one (or eight).
Two of the Dash buttons
There are plenty of posts on the Internet about hardware teardowns of Dash buttons and all the potential from the hardware packed into these guys, but most people have settled on a very simple and practical way of using these in “off label” ways — The gist of it is that each time the Dash button gets pressed the Dash will connect to your WiFi network and send an ARP broadcast to make sure it’s OK to keep using the IP that it has. That ARP is associated to a mostly-unique MAC address which you can then sniff out using another computer on the network. Using this technique you can determine when a Dash button is pressed without having to make any changes to the Dash button hardware or software.
The key here of course is that you must get your Dash button on your WiFi network without completing the setup to Amazon–otherwise you’ll be ordering stuff each time the button is pushed! Luckily it’s surprisingly easy to do this, you pretty much follow all the usual instructions for setup, but then near the final step you simply don’t select a product to associate to the button, instead you quit the app/setup. This leaves your Dash setup to get on your network and make its request to Amazon, but Amazon will reject it because this Dash is not associated to an order or product.
There are a variety of ways to accomplish the sniffing, some people online are using NodeJS, but I’m more comfortable with Python. Python also makes quick work of the TP-Link half of this project.
The script below is a quick and lazy cobbling of some Dash button sniffer logic and TP-Link HS-105 controlling logic. In summary, it sits and listens for an ARP broadcast from the hard-coded MAC addresses, once one is detected it polls the current state of the appropriate TP-Link plug and then sets that plug’s relay to the opposite state.
You can modify the script to attach any number of Dash button MAC addresses to any number of TP-Link plugs–even controlling multiple plugs with a single Dash button press. In the script I have hardcoded everything for simplicity, but you could get fancy about the associations if you wanted.
First note I’ll make is that the Dash buttons will sometimes broadcast an extra ARP beacon or two, to counter this I added in a short 5-sec back-off time to prevent toggling an outlet more than one time in those cases.
I should also note that at this stage of development the error handling is virtually non-existent, in fact it’ll quit if it can’t reach a plug on the network.
That said, it’s good enough for now!
from scapy.all import *
import json
import socket
import time

onCmd = '{"system":{"set_relay_state":{"state":1}}}'
offCmd = '{"system":{"set_relay_state":{"state":0}}}'
infoCmd = '{"system":{"get_sysinfo":{}}}'
port = 9999
brMAC = '68:37:e9:e6:33:f0' # Airheads
lrMAC = 'ac:63:be:b8:31:d4' # Tide
brIP = '10.0.1.44'
lrIP = '10.0.1.39'
brLC = 0
lrLC = 0

def arp_display(pkt):
 global lrLC, brLC
 if pkt[ARP].op == 1: #who-has (request)
   if pkt[ARP].hwsrc == lrMAC:
     print "Pushed Tide - Living Room"
     if (time.time() - lrLC > 5):
       #print "Executing..."
       lrLC = time.time()
       currentState(lrIP)
      else:
        print "Duplicate, skipping..."
     elif pkt[ARP].hwsrc == brMAC:
       print "Pushed Airheads - Bedroom"
       if (time.time() - brLC > 5):
         #print "Executing..."
         brLC = time.time()
         currentState(brIP)
       else:
         print "Duplicate, skipping..."
     #else:
     # print "ARP Probe from unknown device: " + pkt[ARP].hwsrc

def encrypt(string):
 key = 171
 result = "\0\0\0\0"
 for i in string:
   a = key ^ ord(i)
   key = a
   result += chr(a)
 return result

def decrypt(string):
 key = 171
 result = ""
 for i in string:
   a = key ^ ord(i)
   key = ord(i)
   result += chr(a)
 return result

def currentState(string):
 try:
   sock_tcp = socket.socket(socket.AF_INET, socket.SOCK_STREAM)
   sock_tcp.connect((string, port))
   eString = encrypt(infoCmd)
   sock_tcp.send(eString)
   data = sock_tcp.recv(2048)
   sock_tcp.close()
   rawJson = decrypt(data[4:])
   #print rawJson
   decodedJson = json.loads(rawJson)
   currentState = decodedJson["system"]["get_sysinfo"]["relay_state"]
   if (currentState == 1):
     print "Currently ON, turning OFF"
     turnOff(string)
   else:
     print "Currently OFF, turning ON"
     turnOn(string)
 except socket.error:
   quit("Cound not connect to host")

def turnOff(string):
 try:
   sock_tcp = socket.socket(socket.AF_INET, socket.SOCK_STREAM)
   sock_tcp.connect((string, port))
   eString = encrypt('{"system":{"set_relay_state":{"state":0}}}')
   sock_tcp.send(eString)
   data = sock_tcp.recv(2048)
   sock_tcp.close()
 except socket.error:
   quit("Cound not connect to host")

def turnOn(string):
 try:
   sock_tcp = socket.socket(socket.AF_INET, socket.SOCK_STREAM)
   sock_tcp.connect((string, port))
   eString = encrypt('{"system":{"set_relay_state":{"state":1}}}')
   sock_tcp.send(eString)
   data = sock_tcp.recv(2048)
   sock_tcp.close()
 except socket.error:
   quit("Cound not connect to host")

print sniff(prn=arp_display, filter="arp", store=0)
I have a Sony DCR-HC52 miniDV camera that I’ve made a few tapes with over the years, mostly just family parties and the like–things that at the time you mostly don’t care to rewatch, but suddenly after 10+ years the memories become more precious.
Ever since recording video on your phone has become higher quality, and easier to do for long periods, the standard def DV camera has fallen into disuse, but the other day I came across it and decided I’d break it out to convert those old tapes to a more portable digital format while I still had the working equipment and before the tapes got too old.
These DV cameras came with an interface that let you move the data off tape digitally and on to a computer, in theory there is no quality loss like you had when you converted from analog tape/signal to digital. Apple calls the interface “Firewire” and Sony called it “i.Link”. There are other vendor specific names, but the technical (and common) name is “1394”, named for the number assigned to the specification by the IEEE (https://en.wikipedia.org/wiki/IEEE_1394)
My first hurdle, my circa-2014 Macbook Pro doesn’t have Firewire, but it does have Thunderbolt. After confirming online that this is the way to go I bought a Thunderbolt to Firewire 800 adapter and then a Firewire 800 to Firewire 400 (4-pin) cable. Plugging the entire thing in I saw the “DVin” icon flash on my camera for a moment, but otherwise no connection… Further poking around online came up with nothing much except a surprisingly short list of supported DV cameras for iMovie from Apple.
I never did a get a definitive “it won’t work” from my searching, but based on the fact that it doesn’t work it appears that modern iMovie has dropped support for older DV cameras.
One other alternate suggestion online was to break out an older Firewire equipped Mac from an era where these cameras were modern and might still be supported by the older copy of iMovie–I do still have my 15 year old G4 PB, but I decided to go another route and look at Linux options instead.
Within a minute off googling I had the answer–there is an open source program called “dvgrab” that will connect to, control, and pull over the video data from DV devices. A quick question/answer here provided everything I needed:
Fortunately I have an old Lenovo T410 laptop which is running Ubuntu 16.04 and happened to have a 4-pin 1394 (firewire) connector on it, I also had a 4-pin to 4-pin firewire cable laying around (see, this is why I never throw old cables away…)
Installing dvgrab was as easy as running sudo apt-get install dvgrab and then the command to start creating files from tapes was equally easy (because some wonderful askubuntu user put it together 5-7 years ago for me!)–
sudo dvgrab -a -format raw -rewind -t prefix-
The above command will start dvgrab with a few useful options–
-a will try to break the video files up by scene (if you had started/stopped your recordings)
-format raw will save the file as .dv which is the native format … this format is easily playable by VLC and can be imported directly into iMovie
-rewind commands the device to rewind first–convenient if you’re cycling through tapes, you pop it in and run the command it will detail with rewinding and then starting playback as well as stopping when the tape is done
-t will add a timestamp to the file name
prefix- will append whatever you replace that word ‘prefix’ with, for example ’70th_birthday-‘ will append that text to each file created
By default dvgrab will break the video up into 1GB files for easier handling and importing (or smaller if -a finds scene splits)
Make sure that you have plenty of space available as it’s about 1GB per 5 minutes. I have a 250GB SSD in my Lenovo so capture is easy, and then I moved them to a 1TB USB drive for safe keeping.
I was able to copy the files from my Linux machine over to my Mac using ‘scp’ from the Mac command line and then import them into iMovie for editing, titling and saving into a more compressible format (each 1GB .dv file wound up being about 200MB once in .mp4 format).
Now the files can be put up on Dropbox, burned to DVDs, or otherwise spread out to keep the content safe and accessible for more years.
So I figured I would compare these two since I own them both, and this will remind me what I like and dislike about each–
First off, to anyone outside reading this I realize the Kenwood has a lot more features and really is a class higher (and double the price), but anyway…
The good things about Yaesu
Yaesu feels better in my hand by far–the Kenwood is too short, it’s easy to accidentally hit PTT or just generally find it hard to re position in your hand, the smaller size might be something I come to appreciate about the Kenwood later, so who knows…
Yaesu buttons and case have a more study feel vs. the Kenwood.
Yaesu has power and volume on the same knob… seems so simple yet Kenwood decided to stick the volume as the ring (2nd control) under the channel change knob; This makes it difficult to change volume w/o changing channel. This is probably my biggest complaint about the Kenwood–if they had even added an “ear flap” to the volume control that would have been fine, just something to make it easier to move the volume ring and not the channel knob
Yaesu gives you better control over the lamp… again this seems so simple, yet Kenwood has no way (that I have found) to activate the lamp when a signal is received–so if I’m scanning channels I don’t know what repeater or channel I’m on when a signal is coming in… not a big deal, but an annoyance considering there is already a lamp setting in the menu, it would be a better of an additional option or two
Yaesu belt clip can be opened by pushing on the top and it’s spring loaded. Kenwood is just friction fit and relies on the metal retaining shape. I don’t wear the radio on my belt, but I do clip it to a pocket on my backpack and I feel like the Yaesu is more secure
Yaesu has a dedicated squelch knob–actually I should say, it’s not a knob it’s the ring on the channel knob, which is perfect because having an entire knob for squelch seems like a waste. That said, it’s not that hard to push the SQL button on the Kenwood…
Yaesu software for programming is great, the Kenwood’s feels like a DOS converted to Win 3.1 hold over. I also have to manually set offset amount, offset direction, step, etc… those are all set automatically with Yaesu SW or when programming on the radio
This is actually a Kenwood annoyance, not a Yaesu feature… They give you two LEDs on the top to indicate whether you are receiving on Band A or Band B, but they are the same color and are not changeable… it would be great if they had two different colors, or at least let you set one of the LEDs to a blink pattern so you could tell what band you are receiving in the dark
Yaesu dust covers on the side of the radio seem much more study then the Kenwood… I’m certain I’ll break the Kenwood’s off
Yaesu never gets hot while charging… the Kenwood gets noticeably warm when charging (which is pretty much anytime you plug it in)… probably unavoidable given its size and the battery configuration, but it’s an annoyance
Yaesu includes a charging cradle, Kenwood needs to have a barrel plug put in (and the dust flap pulled, another reason it’ll be broken off)
Stuff I like about the Kenwood…
It’s got 220…
It will receive very wide band
You can easy swap between seeing the programmed alpha tag and frequency–on the Yaesu you have to navigate a bunch of menus which seems a bit ridiculous (then again how often are you going to want to do that?)
Alpha tag for frequencies is longer than 6 characters–I like to use 1, 2, 4 to designate 2m, 1.25m or 70cm on the repeater call signs so I appreciate that Kenwood allows 8 characters. I realize this is more of a complaint against the Yaesu LCD size
Lithium Ion battery… with the Yaesu you end up with battery memory if you don’t follow allow deep discharge
Charges with the 12V car plug… the Yaesu will only run from it, but not charge its battery. That means if I’m traveling I need to bring the Yaesu cradle and have access to 120V. Kenwood I can just leave plugged into the car.
Yaesu put the headset and charge inputs too close together and the dust flap is anchored between them… result is very awkward and somewhat forced connections when you’re using both headset jack and DC power jack
Joystick control… makes much easier and faster to get to the menus vs. the Yaesu
So I’m still getting to know both of them, but at this point I think I have the Yaesu feature set and operation down. The Kenwood I’m still working the kinks out. Over all if I had $300 to spend on just one of them I’d go for the Kenwood because dual receivers, lithium ion, and 220 TX are great features for not that much more money. I’m still glad I have the Yaesu though and if you’re looking for a radio under $150 it seems like a pretty good one.


